Saturday, June 2, 2012

Paper Lanterns for Reception Tables

Not too long after our eldest became engaged, I saw an idea for a reception table decoration.  Since she had decided on a rustic theme, I suggested these paper lanterns with a bird window to match her invitations.  We ended up making 17 lanterns in all.  I started way ahead of time with the cutting and scoring, then waited until the week of the wedding for the assembly.  The paper stored flat in a drawer, but the 17 lanterns took up a bit of space.
Paper Bird Lanterns

Here are the supplies that you'll need to get started:  
  • 2 sheets of sturdy paper for each lantern body. 8.5 x 11 is what I used.
  • A translucent paper for the window and the top.  Depending on your cut-out opening, you may be able to get 2 or 3 from a single sheet of 8.5 x 11. My design was about 3 inches from the top of the bird's head to the bottom of his tail.  I got 3 strips from each sheet. You can get 2 tops from one sheet.
  • Exacto knife for cutting out the window shape (or a punch if you can find one in the shape you need.  Butterflies abound:  birds we liked, did not!) This pink swivel x-acto was perfect for all the curvy cuts.
  • Stencil (if you're not using a punch)
  • pen or pencil for tracing your stencil
  • Cutting mat or something to protect your working surface from the knife
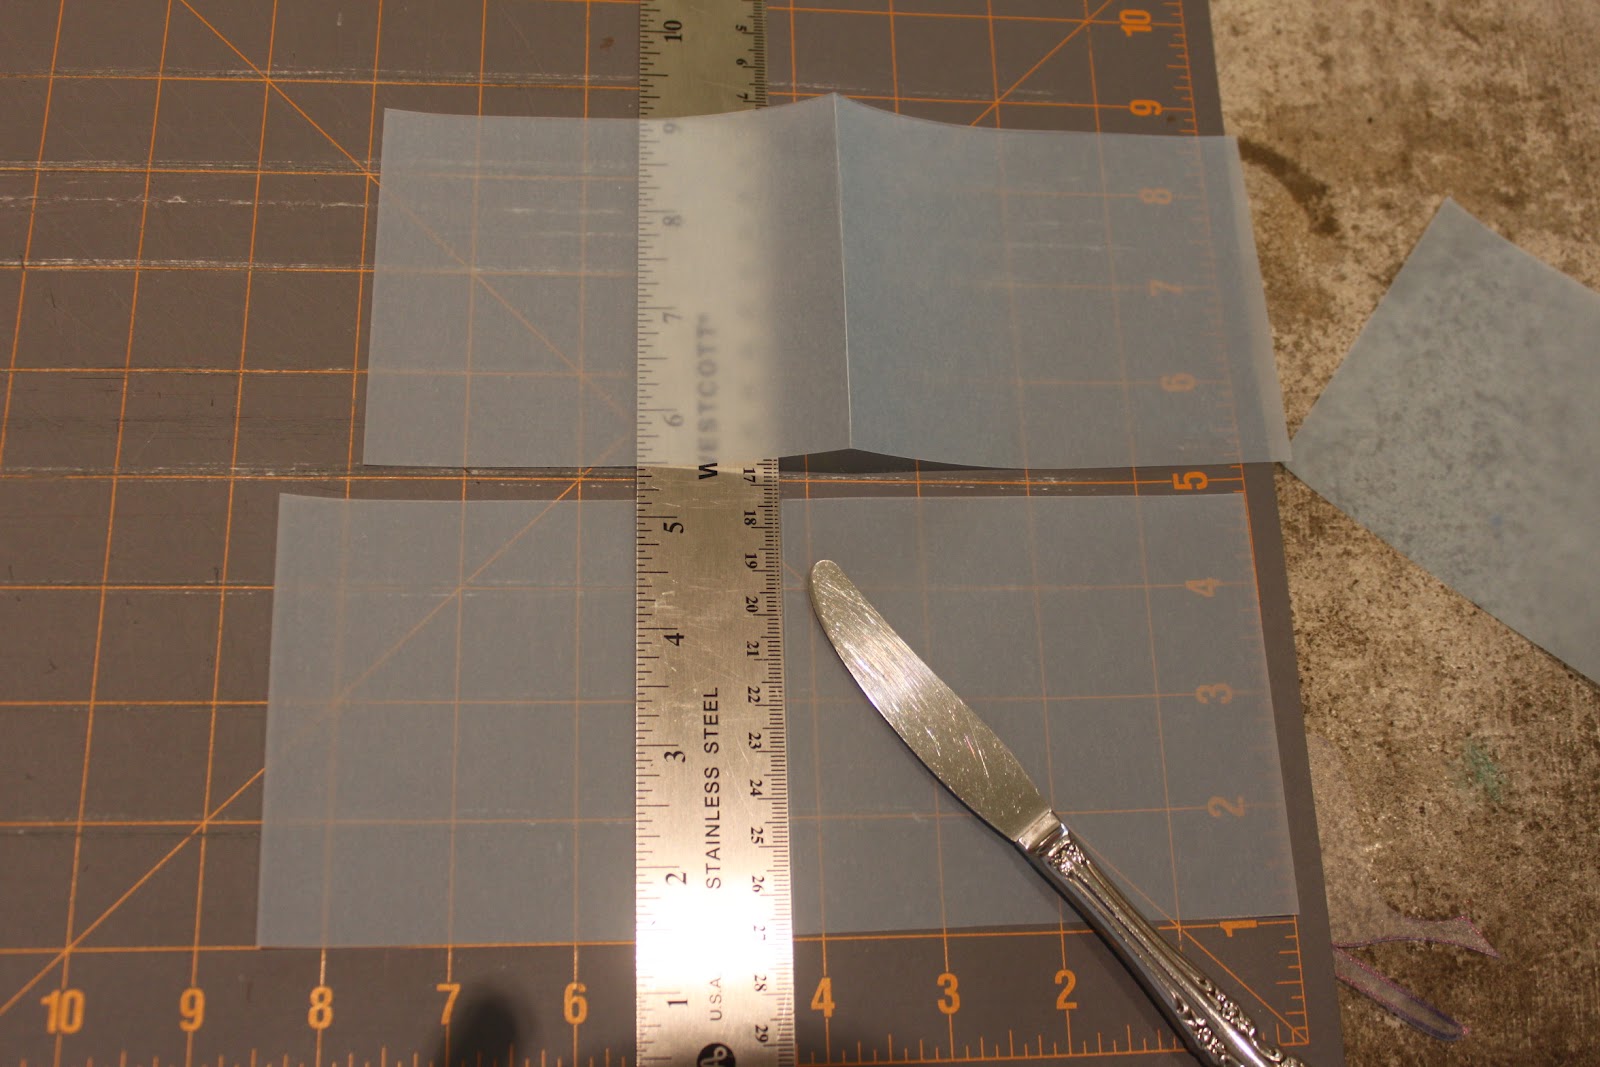
  • Ruler
  • Butter knife (You don't want a serrated blade for scoring for the folds)
  • Glue stick or some other glue made for paper products.  Those sold in the scrapbooking section of your favorite store work best as they don't tend to wrinkle the paper.  Elmer's school glue is a bit wet for this purpose.


The DIY stencil pastic I found was 10 inches wide, which was perfect for my purpose.  The finished lantern is 5 inches on a side.  I drew the outline of the birds we wanted on the stencil.  This design was going to continue around the corner of the lantern, so I centered it on the 10 inch plastic.  If your design is single, center it within 5 inches.
The cut-out openings at the bottom are 3 inches wide.  Leave a 1 inch tab on each end and a 2 inch tab in the center. (1+3+2+3+1= 10)  The last inch of the 11 inch paper will be used to attach 2 pieces together into a square.  Ignore it for now.

You'll notice that the birds are reversed from the above picture to the one below.  Flip the stencil over.  I did this so that when I draw the design on the good paper, I'm drawing on the back of it.  That way, I don't have to worry about pencil lines showing on the good side.  To make sure I always put it properly on the paper, I wrote myself some notes about how to line it up.  If I couldn't read it, I knew I had the stencil wrong side up. (you can click on the picture to see it enlarged)
If your paper has a right side and a wrong side, be sure to have the wrong side up to draw on.  I lined the stencil at the bottom right corner of the paper to draw the foot openings.  Then I slid it up to the top right corner to draw the birds, so they would be closer to the top.
For cutting out the bottom openings, it helps to use a ruler (with a metal edge) as a guide to slide your knife along.  This keeps the line nice and straight.
The picture below shows the paper with the elements cut out.
 Here you'll see that the paper is flipped over to show the right side - the side I didn't draw on.  Now you're ready to score the paper so that the folding lines stay straight.  On the finished lantern, one inch will overlap and be glued to make the box shape.  Line the ruler up one inch from the edge of the paper.  Make sure it's that empty 11th inch that you ignored when you were making your stencil.  Holding the ruler firmly, run the butter knife hard against it to make a grove in the paper.
 Now do the same thing five inches from the other edge.  This will place the score line in the center of the 2 inch foot tab.  You now have a 5-inch section on the left, another 5-inch section in the center and a 1-inch section on the right.
 With the size of my cut out, I was able to cut my translucent sheets into 3 even strips, a bit over 3.5 inches wide.
 The strips needed to fit inside the corner of the box, so I scored them across the middle.
 Now you're ready for some assembly.
(sorry, I forgot to take a picture of an assembly step here.  Fold along those score lines you made on the big lantern papers.  You'll need 2 sheets for each lantern.  Put glue around the cut-out window and place the translucent paper over the opening.  Make sure it's not too tight or loose with the paper folded like it will be when finished.)

Now put some glue on the outside-the good side - of the 1 inch section on one sheet and more glue on the inside - the wrong side- of the other sheet.  Press them together.  Then join the far left with the far right the same way you joined the center.  Glue on the outside of the 1 inch section and the inside edge of the other end.  Stick them together.
Now you've got your basic box.
To make a top, cut a 5.5 inch by 6 inch piece from your translucent paper.  You can get 2 per sheet.  Score it so that you have a 5 inch square in the center.  That will be 1/4 inch from 2 sides and 1/2 inch from the other 2 sides.  Cut the little corners out with scissors so you'll have tabs to attach inside the lantern.  I used tape rather than glue for this attachment.
Here is the finished lantern.  Please be sure to use battery operated lights inside.  You DO NOT want to use candles with a real flame in a paper lantern!

Thursday, May 3, 2012

Transporting Teapots


This is a box containing 9 teapots on my kitchen table.  It went to work with me this morning.
Saturday afternoon, the Ladies Ministry of ABC is having a Titus 2 Tea.  Some of the ladies hosting tables don't own teapots.  I, on the other hand, have quite a few!


In addition to the 9 in the box, there are  at least 7 (that I can see, even though those cabinets are dark) up on the shelves.  The tall white pot in the center cabinet was brought home from Japan by Mr. H's father when he was in the Navy many decades ago.  The tall blue set on the end was made by a friend of my Grandmother Louise.  No one else in the family seemed to want it, but I loved the color and style.


In another cabinet, there's even one still in the box. It was my Grandma Nell's.  She was very proud of that particular set of dishes.

And I have 2 tea pots in my office. (and yes, I have a jar full of tea to brew in them in my office, too)

A few weeks ago, I overheard some of the ladies planning the tea party and mentioned that if they needed any teapots to let me know.  Last night at choir practice, one of the ladies in charge asked if I had 7 or 8.  No problem!

Here is the cast of characters:


     The green and brown pot on the left was a gift from my eldest.  She painted it for me last year at a place called Dandy Doodlez in Starkville.
     The white one with the Chinese character is the only pot I have that has a built-in strainer in front of  the spout on the inside.  It's made for loose tea rather than tea bags.  It gets used a lot.
     Next is a little house.  I can't remember where it came from, but Em insisted that it was too cute to stay home from the party.
     The solid white pot with the tall lid was a wedding present.  It is part of the set of everyday dishes that Mr. H and I picked out 30 years ago.
     In the center is the pot that goes with our current dishes.  I have loved Blue Willow dishes since I read a book about a Blue Willow plate when I was in elementary school.  My mom gave the tea pot to me for Christmas one year.
     The plain white pot to the right of the Blue Willow is the most basic pot I own.  It's just a blue speckled pot, but it's got a very friendly feel to it.  It's heavy and not fancy so there's no fear of breaking an heirloom.  I just really like this pot.
     Take a close look at the next pot.  About 19 years ago a friend of mine was getting married and she invited me to be her matron of honor.  She gave me this pot as a gift.  When I first pulled it out of the box, the lid was was not on it.  Honestly, it looked like a baby's behind!

     The white pot with pink flowers belonged to my Grandmother Louise.  Recently, I found a pattern for a knitted teapot cozy.
I finished it while I was in Peru last week, without a teapot to try it on for fit.  The pot from my eldest and the speckled pot were both too "puffy" (a term we heard from our translators in Peru for those a bit round around the middle!)  But it fits perfectly on the flowered pot. :)

     The last pot, the one with the magnolia on it, is pretty. It also has a label on the bottom warning you that it will last longer if you use hot water rather than boiling water in it.  Really?  I guess that's why the Chinese pot and the speckled pot had to have tea stains removed and this pot looks like it's never been used.  Think about it:  if you aren't supposed to make tea in it, is it really a tea pot?

Herb Garden Update


Here's an update on the herb garden.
Oregano on the top.  Basil in the middle.
Cilantro and dill on the bottom.
It smells wonderful.

Saturday, March 17, 2012

The Herb Garden

Several weeks ago I saw pictures of a patio herb garden made from different size tubs and pails.  I knew I needed to have one on my front porch.

I went to Tractor Supply Co. in Lucedale looking for my tubs.  I had never been in the store before.  What a wonderful place!  Stuff that I didn't know where to find, they have it.  It is on my VBS Mad Science shopping-go-to list from now on.

I got a 16 3/4 gallon tub, a 7 gallon tub, and a 2 or 3 gallon bucket (I can't remember which, but it doesn't really matter.)  I got a 2 cubic yard bag of potting soil at Wal-Mart to fill them up.  I was a little worried that it wouldn't be enough dirt, so I put an empty gallon milk jug (lid on) in the bottom tub in the spot where the smaller tub would rest over it.  No need for lots of soil depth under the next tub.  (be sure to rinse the jug well first.  souring milk releases gases that can blow the lid off and I'm not sure what that would do to the tub above it.)


I planted oregano seeds in the top tier, due mainly to a vague remembrance that oregano can take over a container or even a garden.

The middle tier has basil and rosemary.

In the bottom tub, I planted cilantro and dill.  I don't think the dill has made an appearance yet.  I could be wrong, though, because I've never grown dill.  It may look similar to cilantro in the beginning.


 I am looking forward to the day I can smell all those herbs every time I walk out the front door.


Friday, March 16, 2012

Mrs. Jones and the camera

Being a cat person has its challenges.  Cats in general, and Mrs. Jones specifically, don't like having their picture taken.  Maybe it has nothing to do with their images being captured.  Maybe it has everything to do with just being difficult. 

I was learning how to use my camera this morning and since she was right there close by, I decided to use her as my model.  She was not amused.


I think she got bored when I took pictures of the flowers on the kitchen table.
 

I'm amazed that these flowers are still hanging on.  They were used at the bridal shower for my eldest almost 2 weeks ago.


Since I was not amusing Mrs. Jones, I headed to town.  My first stop was the city park. 


This bridge really jumps out at you.
The tiles on the vertical faces of the amphitheater seating look so bright.  They were designed by the art students in George County schools.


The Depot Greenway is a nice place for photographs, too. 

And I learned that turtles don't like having their pictures taken any more than cats do.

Thursday, March 8, 2012

The Mind of a Printer

What was my printer thinking? 

I press the little printer icon at the top of the Publisher window and get this:
which is exactly what I wanted. 

Then I press that same little icon button on that same Publisher window and get this:

My question is 'Why?'  'What changed?'
The image in the Publisher window is still exactly the same.

One more question: 'Why could I never-in-a-million-years get my printer to do this again if my life depended on this result?'

Wednesday, March 7, 2012

You Know, One of Those Churches in George County...

Monday afternoon, our Worship Pastor's wife brought us a piece of mail that had been delivered to their house, which is next door to the church.  The letter was from a Baptist Association in a neighboring county.  The envelope was addressed to an individual unknown to either of us, therefore probably not a member of our congregation and certainly not in a leadership position here.  Under that lady's name was our church name:  Agricola Baptist.  Under that was an address on a highway that does not exist in George County.  (I did however find it around Mantachie, MS).  Under the unknown highway was Lucedale, MS  39452, which is good for all of George County as well as a bit of Jackson County.

The number portion of the address was changed (by hand) to our Worship Pastor's house number and the highway number was changed to the highway number the church is located on.  His address must be in a data base known to the post office as owned by the church.  After some investigation, I found that the scratched out number was, in fact, the street number of another Baptist church in our community.  The highway number had an extra digit, but was similar enough to assure me that I had found the intended recipient.

Or so I thought...

I had arranged for our housekeeping lady, who also does the housekeeping for the other church, to deliver the misdirected missive.  Problem solved, right?  Wrong.  This particular week, our regular church secretary is on vacation.  She arranged for the previous secretary to take her place while she was gone.  In the course of my speaking to the housekeeper/impromptu-mail-carrier, the substitute secretary heard the name of the individual that the envelope was directed to.  "Oh, she's not at B***** Baptist. She's the WMU director at R**** C**** Baptist."


I called the now 3rd church involved in this misdirection and found that yes, the lady on the envelope was still the Women's Missionary Union director there.  Since it wasn't convenient to send someone out to deliver it across the county, the secretary there said to fax it over and she'd make sure it was delivered to the lady in question. 


I think it's funny that with that one envelope, that neighboring association had covered 3 different churches in George County, where we just about all know each other anyway.