I found a chart when I was looking for a dragonfly created like the firefly of the Sprout’s blanket.d-fly
I worked it up noting that the dragonfly was head down which meant that the narrowest part was at the top.

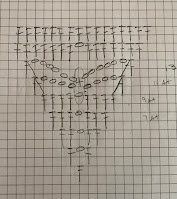

As I went along, I started to think about what sort of background, fill in stitches I should use. Some X-stitches, maybe some shells. Perhaps some rows of bobbles or popcorns. I made a sort of rough draft and was pleased with the effect, but I wanted a different shape. Traditional shawls with a right angle at the tip and straight across the top tend to fall off my shoulders. I wanted something that would hold on a bit better.


I/9-5.5mm (if the edge seems a little too tight, go up a hook size
1 skein Red Heart Super Saver solid (worsted) color: Medium thyme
Magic ring
Dc = double crochet
Ch = chain
V-st = dc, ch1, dc in same st or space
Dc2tog = double crochet 2 together: work a dc to the point there are 2 loops on hook, work another dc in the next stitch, and pull thru all 3 loops to combine them into 1.
Sc = single crochet
Puff st = *y/o, insert hook and pull up a loop, y/o and pull thru 1* repeat 2 more times,y/o and pull thu all 7 loops, ch1 to close. Take care not to work these too tightly or you’ll have a problem pulling the hook thru all the loops. Note: this ch1 at the end is part of the puff. If instructions include a ch1, that means to add a chain after the one that closes the puff.
Dc incr = 2 dc in same stitch
Picot border = sc, (ch3, slip st into the top of the sc just completed to anchor the picot, sc 3) repeat across, adjusting for the center, then repeat again to the other edge, ending with 1 sc
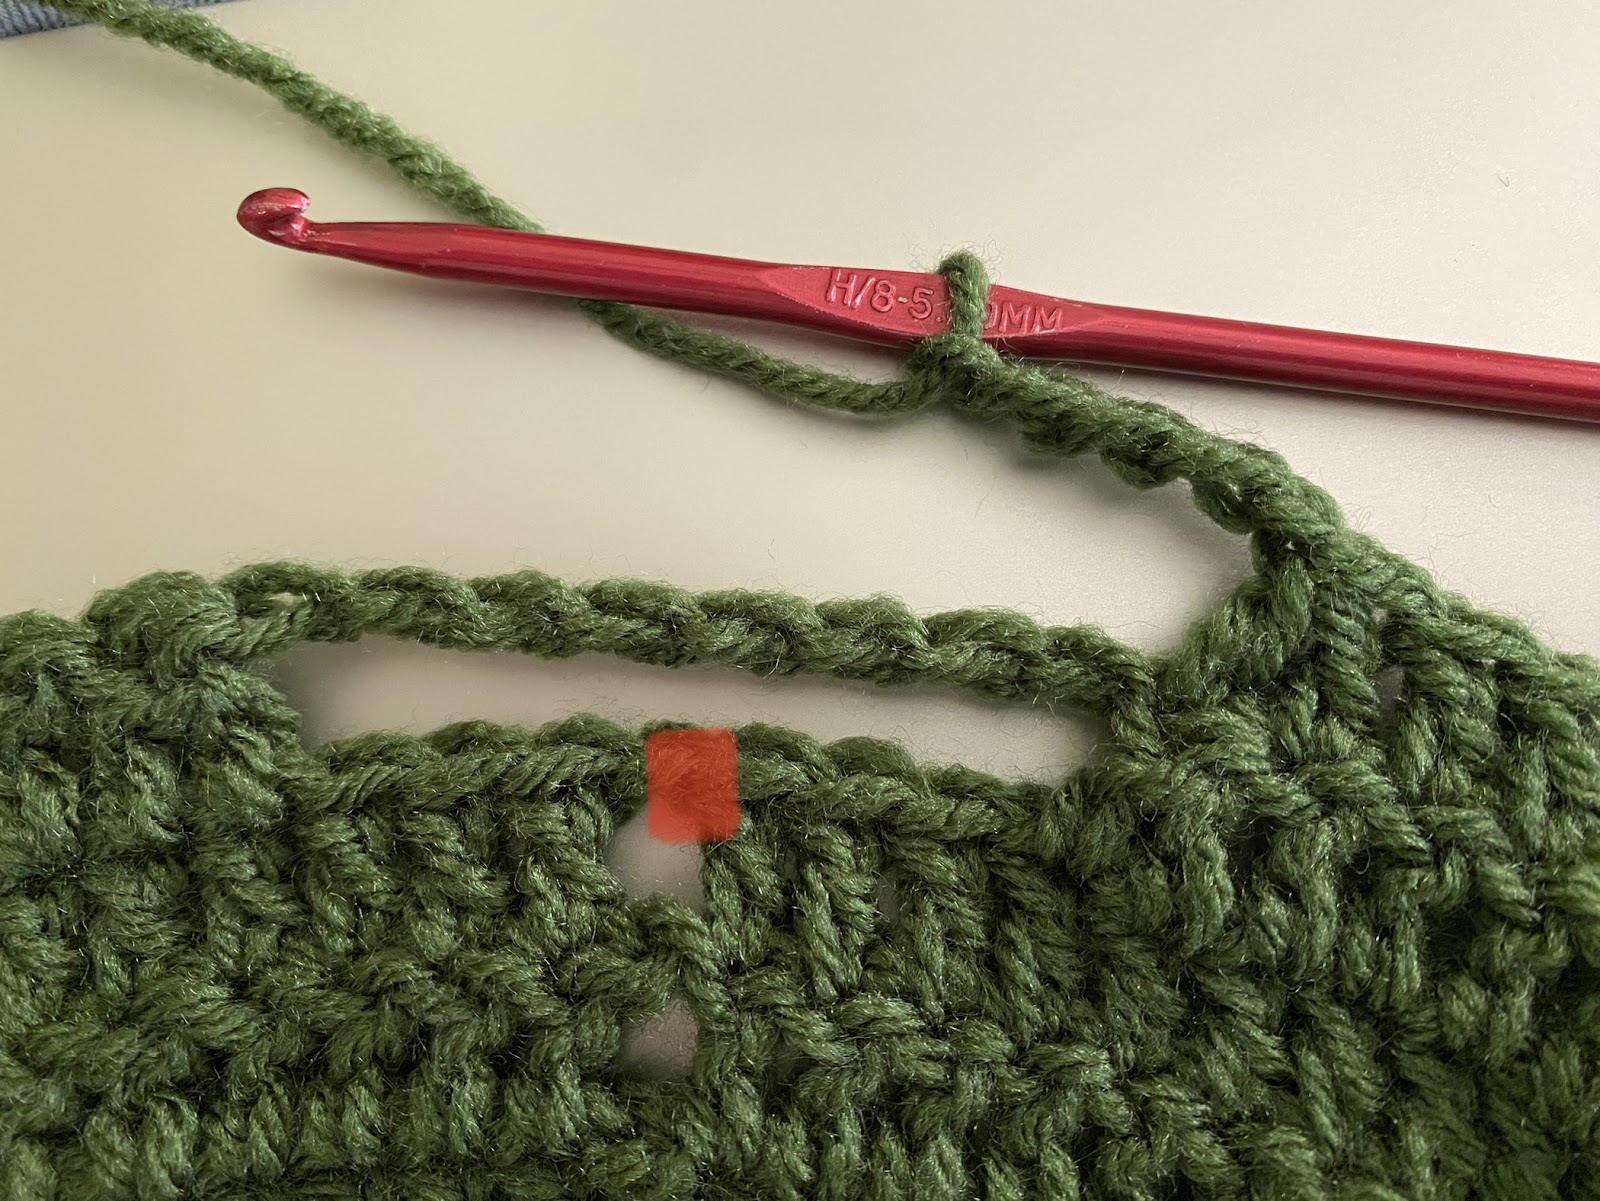
I use a standing dc rather than ch3 to make the first dc of each row. Because this first stitch is sometimes hard to locate on the way back, I always put a marker in it while it’s still on the hook. That way, I always know where that last stitch is to work into it. If you prefer, use a ch3 for that first stitch.
I put the beginning, center, and ending stitches in bold print, just to make them easier to see in each row's instructions.
R1: Into Magic ring: dc, ch2, 2dc, ch1, 2dc, ch2, dc. Close ring. turn.
R2: Dc, ch2, 3dc in ch sp, dc2, (dc, ch2, dc) in ch2 sp, dc2, 3dc in ch sp, ch2, dc in last. turn
R3: Dc, ch2, V-st in ch 2 sp, dc2, ch1, sk1, dc3. (dc, ch2, dc) in ch2 sp, dc3, ch1, sk1, dc2, V-st in ch2 sp, ch2, dc in last. turn
R4: Dc, ch2, V-st in ch 2 sp, dc5 [don't miss the stitch that will go in the ch of the V-st], ch1, sk1, dc4, (dc, ch2, dc) in ch2 sp, dc4, ch1, sk1, dc5, V-st in ch2 sp, ch2, dc in last.. turn
R5: Dc, ch2, V-st in ch 2 sp, dc8, ch1, sk1, dc5, (dc, ch2, dc) in ch2 sp, dc5, ch1, sk1, dc8, V-st in ch2 sp, ch2, dc in last.t. turn
R6: Dc, ch2, V-st in ch 2 sp, dc11, ch1, sk1, dc6, (dc, ch2, dc) in ch2 sp, dc6, ch1, sk1, dc11, V-st in ch2 sp, ch2, dc in last.. turn
R7: Dc, ch2, V-st in ch 2 sp, dc9, dc2tog, ch8 loosely, sk7, dc2tog, dc2, (dc, ch2, dc) in ch2 sp, dc2, dc2tog, ch8 loosely, sk7, dc2tog, dc9, V-st in ch2 sp, ch2, dc in last.. Turn
R9: Dc, ch2, V-st in ch 2 sp, dc15, dc5 in 5ch sp, ch1, dc5 in next 5ch sp, dc4, (dc, ch2, dc) in ch2 sp, dc4, dc5 in 5ch sp, ch1, dc5 in next 5ch sp, dc15, V-st in ch2 sp, ch2, dc in last.. Turn [1 ch2 sp, 33 dc, 1 ch1 sp per side + center ch2 sp]
R10: Dc, ch2, V-st in ch 2 sp, ch1, sk1, dc in ch1 sp, (ch1, sk1, dc) 8X (this should put you at the edge of the stitches worked into the ch5 sp), dc12, (ch1, sk1, dc) 2X, (dc, ch2, dc) in ch2 sp, dc, (ch1, sk1, dc) 2X, dc12, (ch1, sk1, dc) 8X, ch1, sk1, V-st in ch2 sp, ch2, dc in last. Turn [1 ch2 sp, 27dc, 12 ch1 sp (which includes the 1 from the V-st) per side + center ch2]
R11: Dc, ch2, V-st in ch 2 sp, (ch1, puff st in next ch sp) 10X; (ch1, sk1, puff st in next st) 6X; (ch1, puff st in next ch sp) 2X, ch1, sk1, dc in last st of this side, (dc, ch2, dc) in ch2 sp, dc, (ch1, puff st in next ch sp) 2X, (ch1, sk1, puff st in next st) 6X; (ch1, puff st in next ch sp) 10X; ch1, V-st in ch2 sp, ch2, dc in last. turn
R12: Dc, ch2, V-st in ch 2 sp, dc in each dc and ch sp of the V-st ,dc in ch sp before first puff (fpdc around puff st, just 1 dc in the ch sp after puffs) 18X; dc in next 2 st before center; (dc, ch2, dc) in ch2 sp, dc in next 2 st, dc in ch sp, (fpdc around puff st, just 1 dc in the ch sp after puffs) 18X; dc in each dc and ch sp of the V-st, V-st in ch2 sp, ch2, dc in last.Turn [1 ch2 sp, 46 dc, 1 ch1 sp per side + center ch2]
R13: Dc, ch2, V-st in ch 2 sp, dc, dc in ch sp, dc 18, ch2, sk1, dc11, ch1, sk1, dc13, (dc, ch2, dc) in ch2 sp, dc13, ch1, sk1, dc11, ch2, sk1, dc18, dc in ch sp, dc, V-st in ch2 sp, ch2, dc in last. Turn [2 ch2 sp, 48 dc, 2 ch1 sp per side + center ch2]
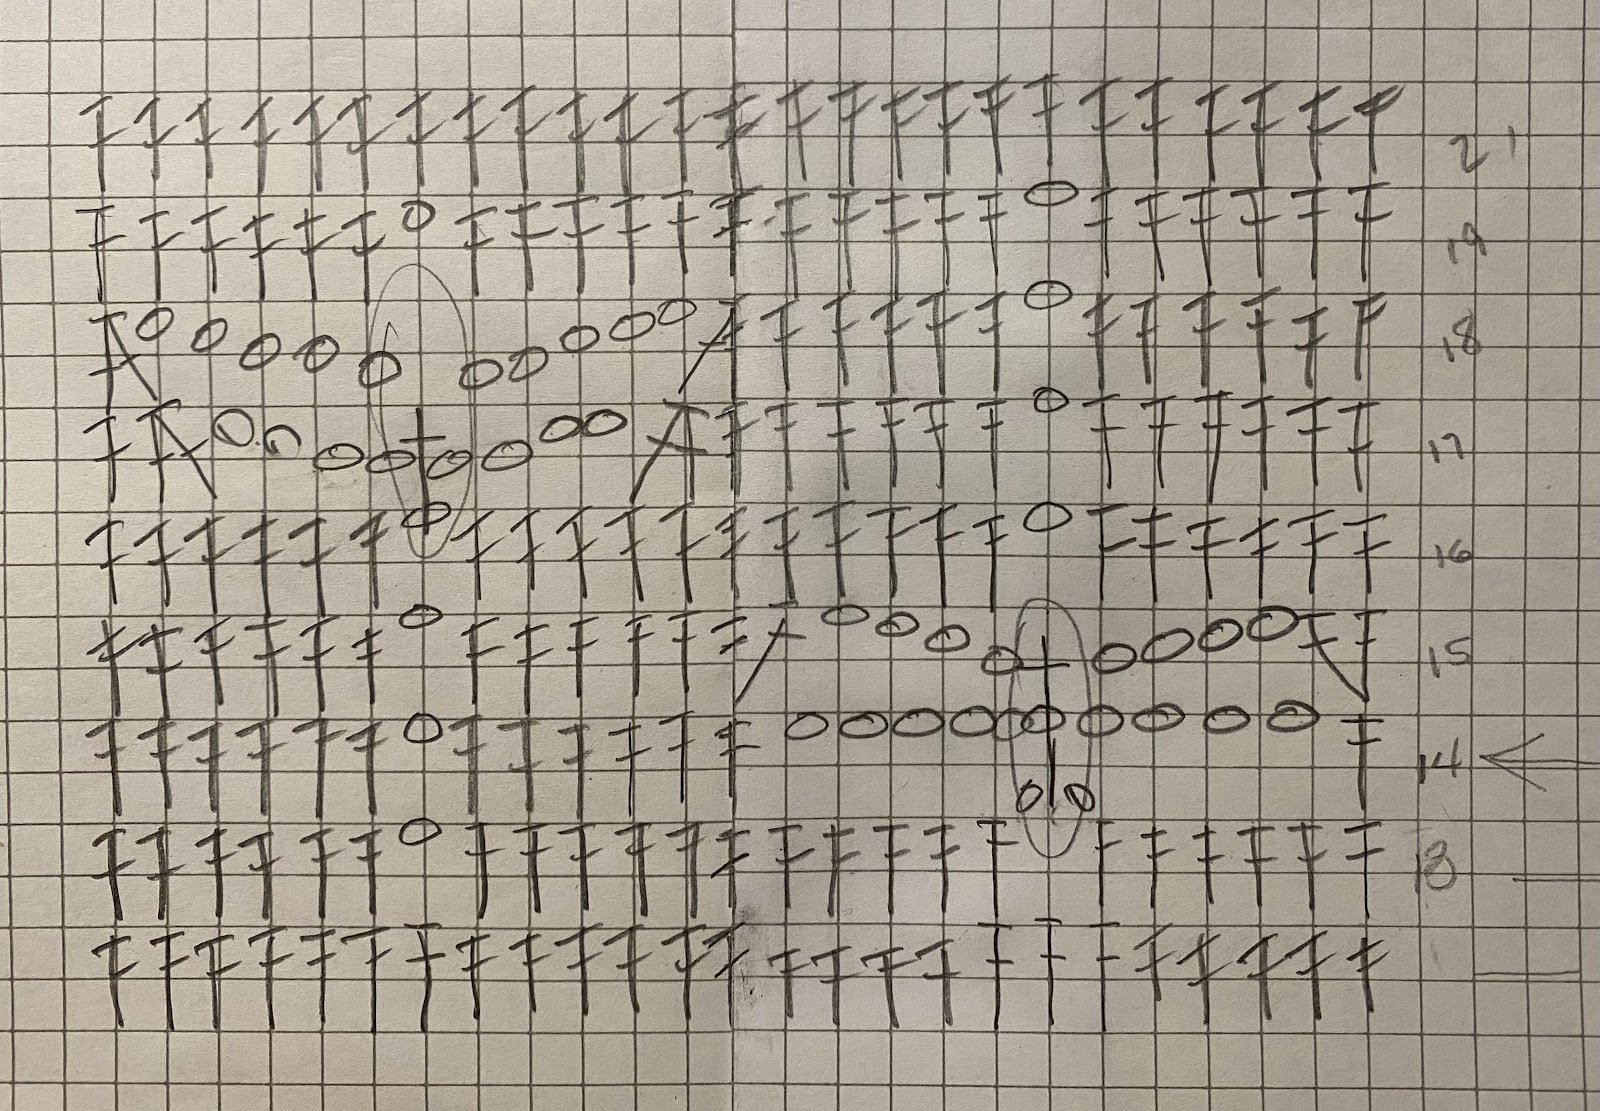
Following is the chart for the 2 dragonfly portion of the first side of the shawl. Reverse it for the 2nd side. My charting skills are not great.
R14: Dc, ch2, V-st in ch 2 sp, dc, dc in ch sp, dc 16, ch10 loosely, sk 12 {which is 5 dc+ ch2+ 5 more dc}, dc6, ch1, sk1, dc14, (dc, ch2, dc) in ch2 sp, dc14, ch1, sk1, dc6, ch10 loosely, sk 12 {which is 5 dc+ ch2+ 5 more dc}, dc18 {don't forget the ch1 of the V-st}, V-st in ch2 sp, ch2, dc in last.Turn [1 ch2 sp, 42dc, ch10 sp, ch1 sp per side + center ch2]
R15: Dc, ch2, V-st in ch 2 sp, dc, dc in ch sp, dc 18, dc incr, ch4 loosely, sc in ch2 sp from R13 (which will capture the center of ch10 from previous row to form the separate wings), ch 4 loosely, sk remaining ch sp, dc incr in next dc, dc5, ch1, sk1, dc15, (dc, ch2, dc) in ch2 sp, dc15, ch1, sk1, dc5, dc incr, ch4 loosely, sc in ch2 sp from R13, sk remaining ch sp, dc incr in next dc, dc20 {don't forget the ch1 of the V-st}, V-st in ch2 sp, ch2, dc in last.Turn [1 ch2 sp, 48 dc, 2 ch1 sp, 2 ch4 sp, 1 sc over 2 rows per side + center ch2]
R16: Dc, ch2, V-st in ch 2 sp, dc, dc in ch sp, dc23, dc4 in long ch sp, ch1, sk1, 4dc in long ch sp, dc7, ch1, sk1, dc to center sp, (dc, ch2, dc) in ch2 sp, dc 16 to ch sp, ch1, sk1, dc7, dc4 in long ch sp, ch1, dc4 in long ch sp, dc 25 {don't forget the ch1 of the V-st}, V-st in ch2 sp, ch2, dc in last.Turn
R17: Dc, ch2, V-st in ch 2 sp, dc, dc in ch sp, dc30, ch1, sk1, dc6, dc2tog, ch8, sk7, dc2tog, dc 12 to center, (dc, ch2, dc) in ch2 sp, dc12, dc2tog, ch8, sk7, dc2tog, dc6, ch1, sk1, dc 32 to ch2 sp, {don't forget the ch1 of the V-st}, V-st in ch2 sp, ch2, dc in last.Turn
R18: Dc, ch2, V-st in ch 2 sp, dc, dc in ch sp, dc33, ch1, sk1, dc5, dc2tog, ch5, sc in ch sp from R16 (which will capture the center of ch8 sp from previous row), ch5, sk remaining ch sp, dc2tog the next 2 st, dc 12 to the center sp, (dc, ch2, dc) in ch2 sp, dc 12, dc2tog, ch5, sc in ch sp from R16 (which will capture the center of ch8 sp from previous row), ch5, sk remaining ch sp, dc2tog the next 2 st, dc5, ch1, sk1, dc35 to ch2 sp, {don't forget the ch1 of the V-st}, V-st in ch2 sp, ch2, dc in last. Turn
R19: Dc, ch2, V-st in ch 2 sp, dc, dc in ch sp, dc36, ch1, sk1, dc6, dc5 in long ch sp, ch1, dc5 in next long ch sp, dc14 to center, (dc, ch2, dc) in ch2 sp, dc14, dc5 in long ch sp, ch1, dc5 in next long ch sp, dc6, ch1, sk1, dc38 to ch2 sp, {don't forget the ch1 of the V-st}, V-st in ch2 sp, ch2, dc in last. Turn
R20: Dc, ch2, V-st in ch 2 sp, ch1, sk1, dc in ch1 sp, (ch1, sk1, dc) 19X (this should put you 1 st before the ch1 sp of the tail), dc20, (ch1, sk1, dc) 7X, (dc, ch2, dc) in ch2 sp, dc, (ch1, sk1, dc) 7X, dc20, (ch1, sk1, dc) 19X (last dc will be in the ch sp of the V-st),ch1, sk1, V-st in ch2 sp, ch2, dc in last. turn
R21: Dc, ch2, V-st in ch 2 sp, (ch1, puff st in next ch sp) 21X; (ch1, sk1, puff st in next st) 10X; (ch1, puff st in next ch sp) 7X; ch1, (dc, ch2, dc) in ch2 sp, puff st in next, (ch1, puff st in next ch sp) 7X; (ch1, sk1, puff st in next st) until you come to the ch1 section; (ch1, puff st in next ch sp) 21x, ch1, V-st in ch2 sp, ch2, dc in last. turn
R22: Dc, ch2, V-st in ch 2 sp, dc in each dc and ch sp of the V-st ,dc in ch sp before first puff (fpdc around puff st, just 1 dc in the ch sp after puffs) repeat to the center, 2 dc’s in last dc before ch2 sp, (dc, ch2, dc) in ch2 sp, 2 dc’s in dc after center, (fpdc around puff st, just 1 dc in the ch sp after puffs), then dc in each st and ch sp until the ch2 at the end, V-st in ch2 sp, ch2, dc in last. turn
R23: Dc, ch2, V-st in ch 2 sp, dc in each st until the center, (dc, ch2, dc) in ch2 sp, dc in each st until the ch2 sp at the end, V-st in ch2 sp, ch2, dc in last.turn
R24: work a row of sc with a picot every 3 stitches, finish off. Make sure the picot in the center is centered in the center, If you have to add a sc or take one away, that’s fine. Just do the same adjustment on the other side of the center.
I added a couple of 1” buttons to one of the arms: one at the end and the other between 8 & 9 rows back. The edge chain spaces are the buttonholes.