Wednesday, June 27, 2012

Another Post about Knitting (sort of)


Talking about knitting yesterday got me to thinking about a certain bible verse:  Psalm 139:13
For you created my inmost being; you knit me together in my mother’s womb.

I must admit, the idea of God knitting intrigues me.  After all, my favorite way of envisioning the Creator is this section from the ceiling of the Sistine Chapel:

How easy to imagine some divine needles in that Hand!

And that started a new train of thought.  I looked at what goes into a knitting project.  There is the idea of what the finished project will be.  There is the joy of the creative process.  There is the tactile satisfaction of feeling the needles and the yarn moving through your fingers.

And the choices:  the color and texture and weight of the yarn, the size and style of needles to get the ideal end dimensions.

I can imagine our Heavenly Father making the same decisions about each one of His children.

He chooses to knit some from soft warm yarn in an even pattern to bring comfort to others.

He selects a durable fiber and an open weave for those He knows will enjoy hard work.

For those who will use more thinking power than muscle power, He works out an intricate internal design.

His children are all different, yet all come from their Father's hand.  They are all knit with love and care . . . even those who seem to have a slipped stitch or a flaw in the pattern.  None of those are accidents on His part.  He has a plan for weaving us together . . . . for folding us over one another to create something entirely new . . . . for using the strengths or advantages of one to complement the very different assets of another.

For what purpose has He knit you?

Tuesday, June 26, 2012

A Post about Knitting

Wednesday night at church, one of the GA leaders came up to me and asked me if a particular young lady had found me yet.  I said "No," and was wondering why this child would be looking for me in the first place.  "She came in asking if anyone knew how to knit because she needed to learn how and we all said no, but we know someone who does!"

How often does the opportunity to pass on something that you love to do come knocking on your door?  After the 2nd person told me the same story, I managed to track down the novice knitter.  She knew how to cast on but didn't know what to do to turn it around and knit back across.  Our families were both ready to head home, so I told her I'd show her as soon as I could.

Sunday morning she and I were both there early.  I had brought some yarn and needles from my office (yes, I have some spare knitting supplies stashed in my office - that's another story) just in case she didn't have hers with her.  I underestimated the determination of this child.  She opened her purse and pulled out a small ball of pink yarn and 2 needles.  The needles were not of the same color and this concerned me momentarily.  Usually needle pairs are color coded for size.  But I realized at this stage, it probably didn't matter that much.  I was also concerned that there was nothing already cast onto either needle.  I remember how much trouble I had with casting on when I was first learning.  I thought we wouldn't have time to get past what I  thought was the hardest part.

She surprised me by saying that casting on was not a problem and promptly cast on about 10 stitches in as many seconds!  Wow!  I was impressed.  And she realized that this was a learning process and was not attempting to make something permanent from that little pink ball of yarn.  She said, "This should be enough to learn how, right?"  Right she was!  I stood behind her, took her hands in mine and guided her through the steps.

With the working yarn at the back, stick the right needle into the first stitch on the left needle from front to back, wrap the yarn around the right needle, then pull it through.  Now slip it off the left onto the right.

Now do it again.

Now do it again.

We were doing pretty well until the slick metal needle slipped out of all the stitches and hit the table.  I told her not to worry.  That had happened to me quite often as I was learning how.  Luckily she hadn't gotten very far, so it would be easy to start over. 

That's when I realized that the 40 year difference in our ages had disappeared into nothing.  I was simply someone who was a bit more experienced at what she would like to be able to do.  I've been knitting for just 3 years or so.  Not very much farther along the learning curve than she. 

How exciting!!


Friday, June 8, 2012

I Will Answer You - VBS Day 5


Today's bible story is from:
God answers the prayers of Paul and Silas.

Whatever Paul and Silas prayed for, God heard and answered those prayers.  When we accept God’s promise to answer us, we will pray in good times and in bad, knowing that he will hear and answer.  And in that faith, we too can rejoice and praise God in any situation.

1 John 5:14 This is the confidence we have in approaching God: that if we ask anything according to His will, He hears us.

God wants us to stick to Him like iron to a magnet.
Have paperclip climb up a ladder.
Rescue a paperclip from a glass of water without getting wet.
Make a chain by using just magnetism to hold paperclips together.

demonstrate the poles – opposites attract
find the north pole by suspending a magnet by thread

make an electromagnet.  Show that it has the same properties as a natural magnet, but only as long as it has battery power.

magnetic fields can be affected by metals thataren’t magnetic, too.  show the 2 balls (one magnet, the other a steel ball.  show that neither sticks to the aluminum pipe. (See if a roll of aluminum foil from the grocery store works!)  drop them individually down a PVC pipe.  Drop the steel ball down the aluminum pipe.  Now drop the magnet down the aluminum pipe.
The falling magnet causes the electrons in the metal tube (which is a conductor of electricity) to move around in a circular, eddy-like current).  Eddy currents have their own magnetic field that opposes the field of the magnet, slowing it down.

Thursday, June 7, 2012

I Will Save You - VBS Day 4

Today's story is from John 19:16-18, 29, 30; 20:24-31


Jesus dies to save us.

Truth learned from today's story:  John’s Gospel was written to that people might learn about and believe in Christ, and by believing, receive eternal life!  When we accept God’s promise to save us, we can live our lives filled with hope, confident in God’s plan to redeem our broken lives and to bring us to our eternal home in Heaven.

Today's memory verse:
John 3:16 For God loved the world so much that he gave his one and only Son, so that everyone who believes in him will not perish but have eternal life.”

People in the old testament tried to build a tower to get to Heaven.  It didn’t work.

I’ve heard people say that rockets go into the heavens.  If you mean the sky or the atmosphere or just way, way up then that’s right.  But there is only ONE WAY to get to Heaven where God wants us to be.

We’re going to build another rocket today.  Yesterday’s rocket was powered by a physical reaction.  Today’s will be powered by a chemical reaction.

need film canisters
alka-seltzer tablets broken in half
1 teaspoon of water (medicine dropper works really well for this)

You can make a nose-cone by cutting a 3 1/2 inch diameter circle in half and rolling, then taping it into a cone shape.  Cut out fins and attach them at the base (open end) of canister. See if this makes a difference in the flight.  You can make a paper cylinder  with attached nose cone and place it over the canister.  

You can also make a container for hand-held launches

Wednesday, June 6, 2012

I Give You What You Need - VBS Day 3


I GIVE YOU WHAT YOU NEED

Today's story is from Mark2:1-12
Jesus helps a man brought by four friends

Truth learned from today's story:  When we accept God’s promise to give us what we need, we can trust that He knows our needs even better than we do.  We can be content in knowing that He will provide.

Today's memory verse:
Philippians 4:19 And this same God Who takes care of me will supply all your needs from His glorious riches, which have been given to us in Christ Jesus.”

God has given us all sorts of things:  hands to do things with, brains to think up ideas, feet to take us where we need to go, friends and families to keep us from being alone.

balloons, strings, straws, tape
That should do it!

race 2 teams
race one kind of string against a different kind.
use different length straws

Offer wool yarn, kitchen twine, and mono-filament. Others?
Several shapes and sizes of balloons.
The straws are cut in half (leftover from bubble day at last year’s VBS.) They can choose to use just one or as many more as they think necessary.

Focus on the teamwork and staying with the plan.  What’s the most important element of the demonstration?  (Hint:  Who had to choose the string and the balloon?  Who had to hold the string?  Who had to blow up the balloon?  Who had to hold it and then release it at the right time?  Who had to tape it to the straws?) A PERSON!!!  People are always more important than things.  Jesus wasn’t concerned about the roof – He was concerned about the 4 men and their friend.  The 4 men had to work together.  If 2 lowered their end of the mat and 2 didn’t, the paralyzed man would have had broken bones and a concussion on top of his other problems.  The 4 men worked as a team to get the job done.  One couldn’t have done it alone.
Our goal as Christians is to be more like Jesus.  If He cared more about people than things and gave them what they needed, we should be the same way.

Tuesday, June 5, 2012

I Care About You - VBS Day 2


Day 2


I CARE ABOUT YOU

Today's story is from John11:1-3, 17-44
Jesus cares for Mary, Martha, and Lazarus

Truth learned from today's story:
"When we accept God’s promise to care about us, we know that He shares our pain-just as He shared the pain of Mary and Martha.  And yet, in the midst of that pain, we can be confident that God knows what is to come.  Even though we may not understand the struggles that we face, we know that God cares about us."

Today's memory verse - 1 Peter 5:7 Give all your worries and cares to God, for He cares about you.”

Have you ever been down in the dumps?  We use the word down for when we’re feeling bad.  Have you ever been on cloud 9? Clouds infer sky which is up.  We always think of Heaven as up.  We can make some sad paper scraps or Rice Krispies get happy with static electricity.
Most things (like you, the wall , a soda can, stuff on a paper plate...) have a positive static charge.  When we rub a balloon on our hair or the wool on a PVC  pipe, we build up a negative static charge.  What happens between opposite charges (like N and S on a magnet)?  They attract.
Electrons will rub off some objects and stick to the surface of others. Regular electricity flows, but static electricity is “static” which means not moving.  It sits on the surface of the pipe or the balloon.
Rub a balloon in your hair.  Hold over a paper plate filled with tissue paper scraps or Rice Krispies. (The link says use a record album, but the balloon works much better and is easier to acquire.
Move the balloon over a child’s head (light colored hair works better.)
Make the balloon stick to the wall
Make an empty aluminum soda can roll across a table top.
It’s all because the balloon has extra electrons.  It wants to give those electrons to all the positively charged things, so they move together.
The charged balloon can alter the flow of a small stream of water from the tap.
Tie 6 small strands of tinsel together at each end.  Charge the PVC pipe or a balloon by rubbing it in your hair or with a wool glove. Drop the tinsel onto the balloon or pipe. The tinsel is attracted to the negative charge.  Then, when it touches the pipe, it picks up the negative charge.  What happens between like charges?  They repel.  Even the individual strands of the tinsel are repelling each other.  That’s why it looks like a ball.

Monday, June 4, 2012

I Am With You - VBS Day 1


Every day this week, I'm going to post my Mad Science notes.  It's probably a bit disjointed for reading, but it covers what we talked about and has links for ideas that you can do at home.

Today's story is from Daniel 3:1, 4-28
God is with Shadrach, Meshach, and Abednego.

Truth learned from today's story: 
"Because they knew God was with them, Shadrach, Meshach, and Abednego stood boldly for what was right.  When we accept God’s promise to be with us, we can stand firm in whatever circumstances we face, know we too are never alone."

Today's memory verse - Isaiah 41:10 
 So do not fear, for I am with you;
    do not be dismayed, for I am your God.
I will strengthen you and help you;
    I will uphold you with my righteous right hand.

I really like that part at the end:  “I will uphold you with my righteous right hand.”  Think about what you do with your hand:  not just things that require both hands, but your “doing” hand.  Most people are right handed.  (You lefties, I understand your frustration.  Mr. H is a lefty and so is Dr. T and my new SIL). 
God specified His right hand because that was understood as the hand of purpose.  If you’re going to pick up a pen or pencil to write something, you pick it up with a specific hand, your working or dominant hand. 
Today, we’re going to make something with our hands:  Paper Airplanes.  I have a few different types to show you.  Some work better for some purposes than others.  Some don’t even look likeairplanes!
Show them how to make Nakamura Loch. Explain dihedralangle (Y profile), elevator, and rudder.
Sometimes bad things happen to us.  But even though those things might be a bit painful, they might be happening to help us.  If I use my hands to tear the back wing of the air plane it might seem like I’m damaging it.   However, if I make those tears to create some elevator flaps, it will keep the plane from diving into the ground.  Let God keep you in the palm of His righteous right hand.  That’s where the most useful tools do their best work.
Here are some other websites that have different airplane designs:


Saturday, June 2, 2012

Paper Lanterns for Reception Tables

Not too long after our eldest became engaged, I saw an idea for a reception table decoration.  Since she had decided on a rustic theme, I suggested these paper lanterns with a bird window to match her invitations.  We ended up making 17 lanterns in all.  I started way ahead of time with the cutting and scoring, then waited until the week of the wedding for the assembly.  The paper stored flat in a drawer, but the 17 lanterns took up a bit of space.
Paper Bird Lanterns

Here are the supplies that you'll need to get started:  
  • 2 sheets of sturdy paper for each lantern body. 8.5 x 11 is what I used.
  • A translucent paper for the window and the top.  Depending on your cut-out opening, you may be able to get 2 or 3 from a single sheet of 8.5 x 11. My design was about 3 inches from the top of the bird's head to the bottom of his tail.  I got 3 strips from each sheet. You can get 2 tops from one sheet.
  • Exacto knife for cutting out the window shape (or a punch if you can find one in the shape you need.  Butterflies abound:  birds we liked, did not!) This pink swivel x-acto was perfect for all the curvy cuts.
  • Stencil (if you're not using a punch)
  • pen or pencil for tracing your stencil
  • Cutting mat or something to protect your working surface from the knife
  • Ruler
  • Butter knife (You don't want a serrated blade for scoring for the folds)
  • Glue stick or some other glue made for paper products.  Those sold in the scrapbooking section of your favorite store work best as they don't tend to wrinkle the paper.  Elmer's school glue is a bit wet for this purpose.


The DIY stencil pastic I found was 10 inches wide, which was perfect for my purpose.  The finished lantern is 5 inches on a side.  I drew the outline of the birds we wanted on the stencil.  This design was going to continue around the corner of the lantern, so I centered it on the 10 inch plastic.  If your design is single, center it within 5 inches.
The cut-out openings at the bottom are 3 inches wide.  Leave a 1 inch tab on each end and a 2 inch tab in the center. (1+3+2+3+1= 10)  The last inch of the 11 inch paper will be used to attach 2 pieces together into a square.  Ignore it for now.

You'll notice that the birds are reversed from the above picture to the one below.  Flip the stencil over.  I did this so that when I draw the design on the good paper, I'm drawing on the back of it.  That way, I don't have to worry about pencil lines showing on the good side.  To make sure I always put it properly on the paper, I wrote myself some notes about how to line it up.  If I couldn't read it, I knew I had the stencil wrong side up. (you can click on the picture to see it enlarged)
If your paper has a right side and a wrong side, be sure to have the wrong side up to draw on.  I lined the stencil at the bottom right corner of the paper to draw the foot openings.  Then I slid it up to the top right corner to draw the birds, so they would be closer to the top.
For cutting out the bottom openings, it helps to use a ruler (with a metal edge) as a guide to slide your knife along.  This keeps the line nice and straight.
The picture below shows the paper with the elements cut out.
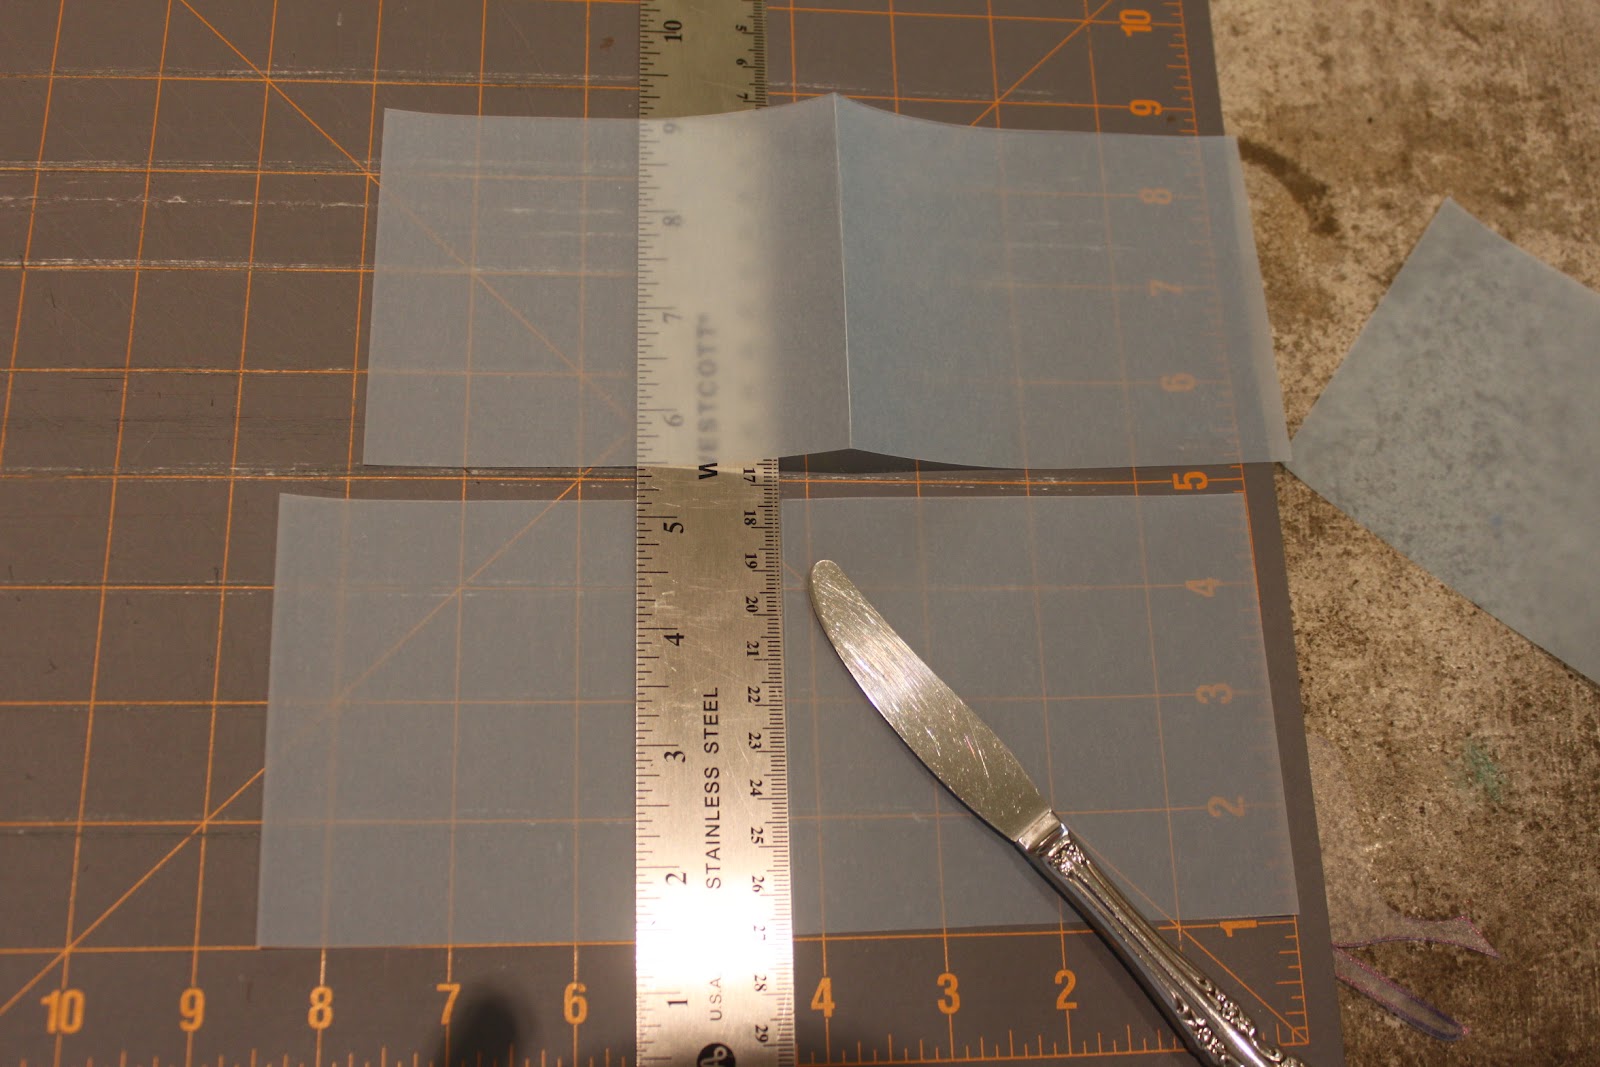
 Here you'll see that the paper is flipped over to show the right side - the side I didn't draw on.  Now you're ready to score the paper so that the folding lines stay straight.  On the finished lantern, one inch will overlap and be glued to make the box shape.  Line the ruler up one inch from the edge of the paper.  Make sure it's that empty 11th inch that you ignored when you were making your stencil.  Holding the ruler firmly, run the butter knife hard against it to make a grove in the paper.
 Now do the same thing five inches from the other edge.  This will place the score line in the center of the 2 inch foot tab.  You now have a 5-inch section on the left, another 5-inch section in the center and a 1-inch section on the right.
 With the size of my cut out, I was able to cut my translucent sheets into 3 even strips, a bit over 3.5 inches wide.
 The strips needed to fit inside the corner of the box, so I scored them across the middle.
 Now you're ready for some assembly.
(sorry, I forgot to take a picture of an assembly step here.  Fold along those score lines you made on the big lantern papers.  You'll need 2 sheets for each lantern.  Put glue around the cut-out window and place the translucent paper over the opening.  Make sure it's not too tight or loose with the paper folded like it will be when finished.)

Now put some glue on the outside-the good side - of the 1 inch section on one sheet and more glue on the inside - the wrong side- of the other sheet.  Press them together.  Then join the far left with the far right the same way you joined the center.  Glue on the outside of the 1 inch section and the inside edge of the other end.  Stick them together.
Now you've got your basic box.
To make a top, cut a 5.5 inch by 6 inch piece from your translucent paper.  You can get 2 per sheet.  Score it so that you have a 5 inch square in the center.  That will be 1/4 inch from 2 sides and 1/2 inch from the other 2 sides.  Cut the little corners out with scissors so you'll have tabs to attach inside the lantern.  I used tape rather than glue for this attachment.
Here is the finished lantern.  Please be sure to use battery operated lights inside.  You DO NOT want to use candles with a real flame in a paper lantern!